Christmas Card Photo Ideas
Instructions
Scroll below to find more instructions of my Christmas card photo ideas.
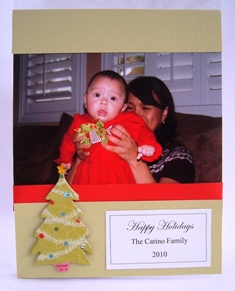
LIME GREEN AND RED CHRISTMAS CARD PHOTO IDEA

Card Making Supplies:
-10” x 6 ½” lime green paper
-Photo cut size: 5” x 3 ½”
-3/8” wide red ribbon cut to 5” long (if you’d like to wrap the ribbon around the photo so you don’t have any frayed ends, cut ribbon 6” long and fold over ½” of the ribbon around the photo on both ends. Secure with tape).
-Adhesive chipboard sticker or other embellishment
-2 ½” x 1 ½” message label
Instructions:
Place your photo 1 inch from the top of card and tape.
Center and tape the red ribbon over photo and lime green card.
Adhere the chipboard sticker.
Tape the message label about ¼” from the side and bottom corner. Create a message label using a printer or use a stamp to create your message. I like to use lightweight cardstock or I double up on regular weight printing paper. This makes the message label crisp white.
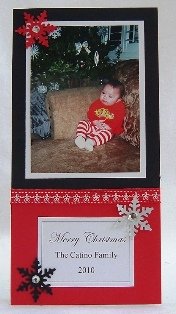
BLACK AND RED PHOTO CARD WITH SNOWFLAKES

Card Making Supplies:
- 4" x 8" red cardstock paper
- 4" x 5 1/4" black paper (it doesn't have to be cardstock since it's taped over red cardstock paper)
- 3 1/4" x 4 1/4" white paper
- Photo cut size: 3" x 4"
- 3/8" wide ribbon cut 4" long
- 2 1/2" x 1 3/4" message label (I've used a laser printer but you can use a stamp or scratch letters to create your message).
- 3 punched snowflakes (I used Martha Stewart brand), Colors: red, black and silver
- 3 stick on jems
Instructions:
Tape the black paper over the red paper, flush against the top and sides of card.
Center and tape your photo on the white paper.
Center and tape your white card/photo on black portion of card.
Glue or tape ribbon along edges where black and red papers meet. (I like to use a hot glue gun because I find double sided tape isn't secure enough. There's nothing worse than your card falling apart in the mail).
Glue or tape the snowflakes. Refer to image for placement.
Stick the jems on snowflakes.
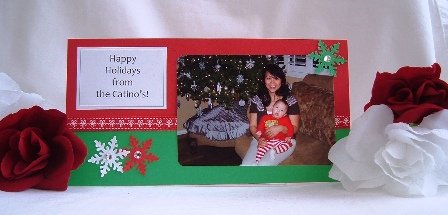
GREEN AND RED PHOTO CARD WITH SNOWFLAKES

Card Making Supplies:
- 4" x 8" red cardstock paper
- 1 3/4" x 8" green paper (it doesn't have to be cardstock since it's taped over red cardstock paper)
- Photo cut size: 4 1/2"w x 3"h
- 3/8" wide ribbon cut 8" long
- 2 1/2" x 1 3/4" message label (I've used a laser printer but you can use a stamp or scratch letters to create your message).
- 3 punched snowflakes (I used Martha Stewart brand), Colors: red, green and white
- 3 stick on jems
Instructions:
Tape the green paper over the red paper, flush along the bottom and sides of card.
Glue or tape ribbon along edges where red and green papers meet.
(Note: like to use a hot glue gun because I find double sided tape isn't secure enough. You can also use adhesive dots. There's nothing worse than your card falling apart in the mail).
Tape your photo about 1/2" from the right side, top and bottom.
Glue or tape the snowflakes. You can also use adhesive dots. Refer to image for placement.
Stick the jems in the middle of the snowflakes.
Note: Your Christmas card photo ideas can be simple or elaborate. You can choose just about any size but remember to consider your envelope size. I like using blank cards because it already includes the envelope. You can also use blank cards for the Lime Green and Red Christmas card photo idea.
Christmas card photo ideas - click here for more.
Back to Home Page

